USP Controller Deployment at Microsoft Azure Cloud

USP Controller Cloud Deployment
Nowadays businesses need software that can adapt quickly and work smoothly across different environments. Oktopus is a custom solution, like many powerful tools, deploying it can be challenging. In this blog, we’ll walk through how to deploy Oktopus using Docker-Compose. If you're looking for a straightforward way to deploy Oktopus without headaches, this guide is for you.
Note:
In this blog post, we assume that you have a Microsoft account with a valid Azure subscription. If not, feel free to sign up for one at the Azure portal where you can start with free credits to explore and test out Azure services.
Part 1: General architecture deployment
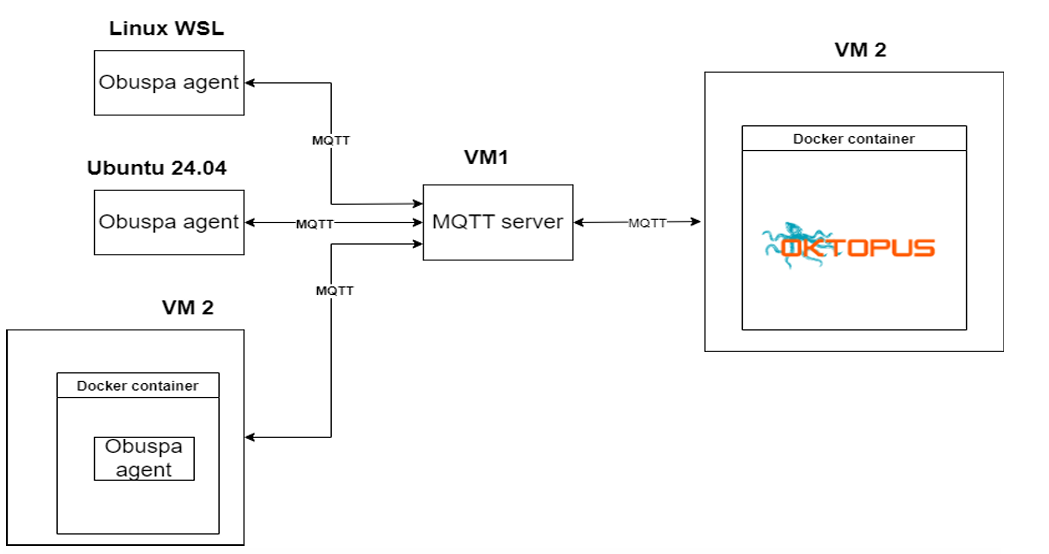
The easiest way to install Oktopus is in a standalone mode with every component running in the same machine. However, in a production environment, it is recommended to deploy the MTPs (MQTT Broker, Websockets and STOMP servers) and ACS in different servers apart from the core Oktopus microservices. This way, you can scale your solution and have a more robust and secure environment.
Oktopus Controller has support to TR-069 protocol with ACS and all USP MTPs as well, although in this blog we will focus on USP standard through MQTT.
Our approach consists of deploying the following Oktopus components: USP Controller, MQTT broker and USP Agent (CPE). All parts will be detailed in the next paragraphs.
Part 2: Infrastructure provisioning
1. Creating VMs
To get started, we first create two Linux virtual machines (VMs) using the Azure portal. Ensure that you have full access to these machines, including SSH terminal and root privileges. If you encounter any difficulties during the setup, feel free to check out this helpful tutorial for step-by-step guidance.
For the purposes of this blog, we will be running our tests using the following Azure VM plans, which we recommend for optimal performance:
- MQTT Server (VM1): B2s plan
- Oktopus (VM2): B1s plan
2. Installing Docker
Install Docker and Docker-Compose on both VMs. The installation process is well-documented in the official Docker documentation.
3. Defining Network rules
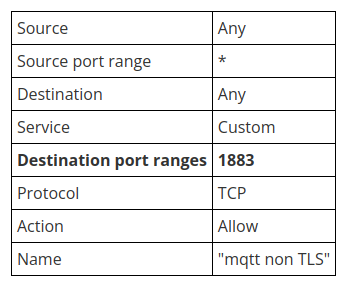
As you know, MQTT uses the port 1883 but it’s not allowed on default. So we need to define new port rules in both VMs.
Choose VM1-> VM Networking -> Inbound rules -> Add inbound port rule.

We need also to create the same port rule using the same characteristics for outbound connections.
Choose VM1-> Networking -> Outbound rules -> Add outbound port rule

In order to make sure that we successfully completed the right steps . Try SSH connection for both VMs and try this command at VM1:
younes@BrokerMachine:~$ netstat -tulenThe output should be similar to this:

4. Preparing Agent environment
As can be seen in the arcthitecture section, we will be deploying OBUSPA across three different environments. However, we will focus specifically on the WSL (Windows Subsystem for Linux) environment. Still though, you can follow the same steps provided on this guide to install USP agent on any other Linux or macOS distribution.
Installing WSL is straightforward. Simply follow the instructions provided in the official Microsoft documentation to get WSL up and running on your system.
Part 3: Deployment of different components
1. MQTT Broker
To use Oktopus, we need to deploy a custom-developed MQTT broker. This broker is based on the open-source Mochi MQTT broker but has been enhanced to automate specific actions through predefined hooks (e.g., sending topics that include the Agent EndpointID, custom MQTT packets headers, among other tasks).
To get started, simply pull the Docker image and follow these steps to start the broker:
younes@BrokerMachine:~$ sudo docker pull oktopusp/mqtt
younes@BrokerMachine:~$ sudo docker run -d --name mqtt_container -p 1883:1883 oktopusp/mqtt
The output should be similar to this

2. USP Controller
The next task is to install Oktopus Controller on VM2. To accomplish this, follow the steps below:
root@younesHost:/home/younes# git clone https://github.com/OktopUSP/oktopus.gitroot@younesHost:/home/younes# cd oktopus/deploy/compose/
In order to make Oktopus to know the MQTT Server that we just installed in VM1, we need to configure it by editing the value of the variable "MQTT_URL" defined in "deploy/compose/.env.mqtt-adapter". It’s value will be the IP address of the MQTT Server (VM1).
root@younesHost:/home/younes/oktopus/deploy/compose# nano .env.mqtt.adapter
MQTT_URL=tcp://<vm1_ip_address>:1883
The final step is to start it
root@younesHost:/home/younes/oktopus/deploy/compose# COMPOSE_PROFILES=nats,controller,mqtt,adapter,frontend docker compose up -dMake sure that we successfully completed the right steps. Try this command:
root@younesHost:/home/younes# docker ps -aYou should see all Oktopus containers listed with status "Up".
3. OBUSPA
As mentioned earlier, we'll be installing OBUSPA on WSL. The complete steps are thoroughly detailed in the official Broadband Forum GitHub repository, at QUICK START GUIDE section.
Note:
Here we install OBUSPA at the Operating System level, but it's also possible to run OBUSPA in a containerized environment. The USP agent is encapsulated in a easy to use docker container. You can change the factory reset file the same way that we're going to do below and then run the Agent as explained at Oktopus Agent Simulator documentation.
The objective is to ensure the agent recognizes the controller over the MQTT connection. To achieve this, we need to modify the agent's data model. Specifically, we’ll be editing OBUSPA's factory reset file. There is a MQTT configuration template provided on GitHub, which you can access and download from here.
Now edit the file adding the public IP address of the MQTT Server:
Device.MQTT.Cient.1.BrokerAddress "<public_ip_address_of_mqtt_server_vm1>"Please be cautious when making changes, as editing any other values may cause issues. Handle the file with care to avoid unexpected problems.
Part 4 : Results and Validation
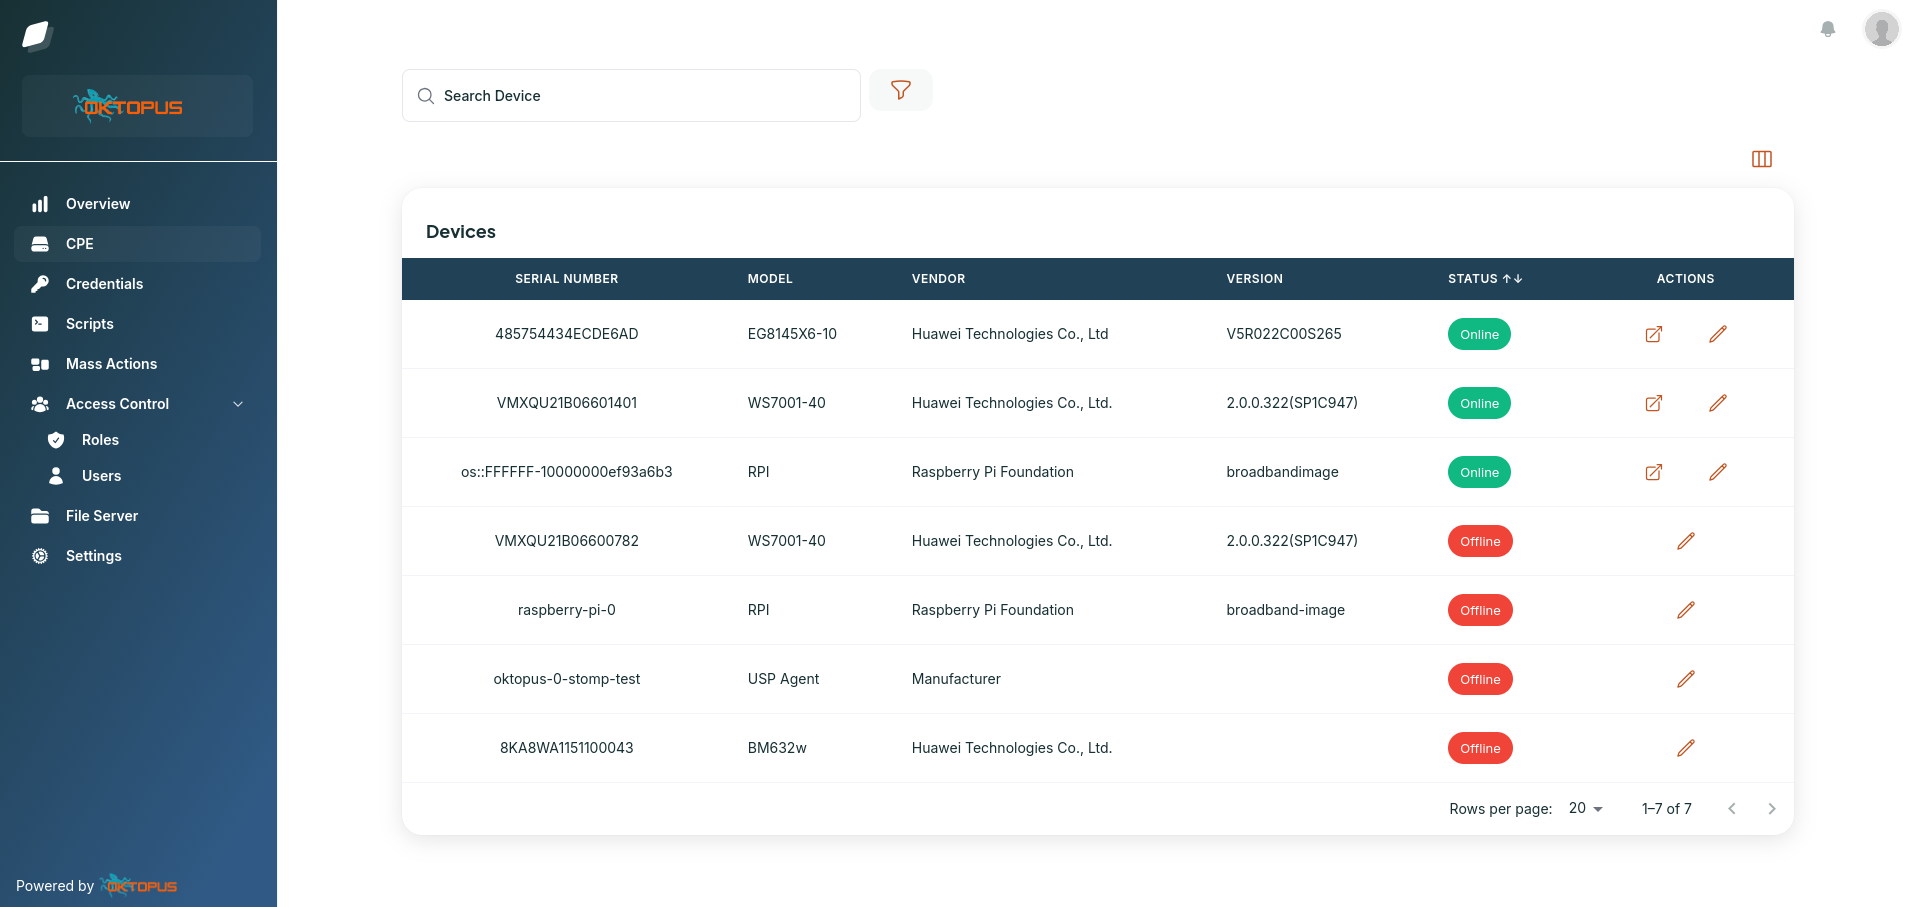
Congratulations on making it this far! now it's time to see the results of all your hard work. After acceding the Oktopus Web interface (it uses the same public IP address of VM2), create a user and login.
Start the agent (In WSL environment) using the config file that we just edited. You can simply use this command:
$ obuspa -p -v 4 -r oktopus-mqtt-obuspa.txt -i eth0And here we go. The agent is successfully connected to Oktopus:

After a long journey, you've now completed all the essential steps. Well done on your perseverance and hard work, it’s a significant achievement to reach this point! With everything in place, the Oktopus Controller is now ready for action, and you're equipped to further enhance and optimize its functionality as needed.
For production workloads there are many details and aspects to consider, but the three main subjects not covered in this blog are:
- MQTT TLS encryption.
- TLS for Oktopus Web interface.
- USP agent authentication to MQTT.
Hopefully we'll get those covered in a future blog post.
Keep in alert for more content about Oktopus, USP protocol and how it is helping companies in the telecommunications sector to grow and offer more and better services to their customers.
Take control of your
network today
The world’s most widely used open-source USP Controller and CWMP Auto Configuration Server, with enterprise-class features, services and premium support.


